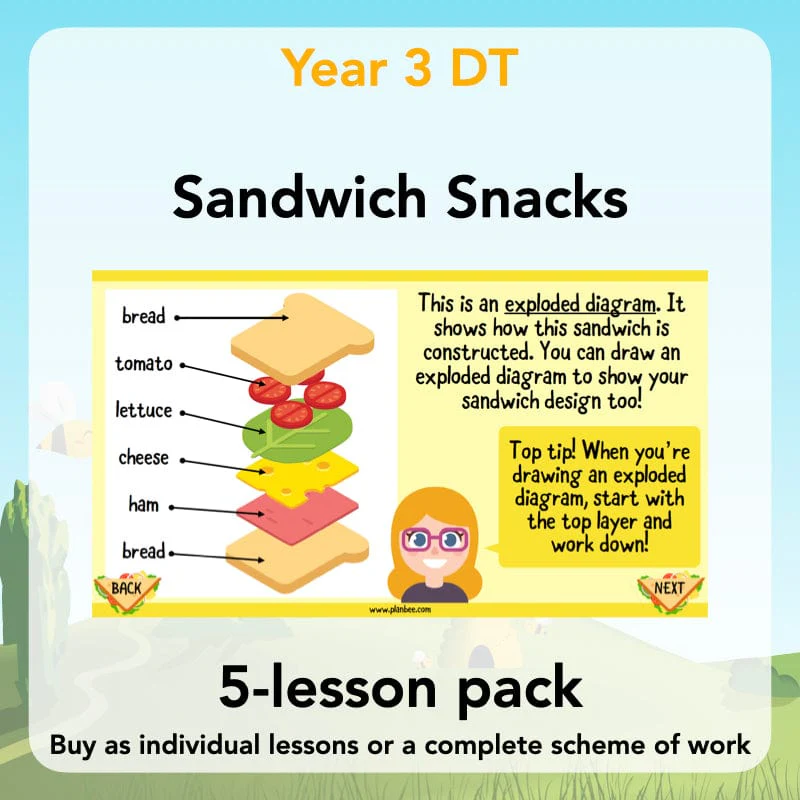


Light-Up Signs
Use woodworking DT tools and materials, card and paper or even scrap materials to make an decorative light box with illuminated words or letters. This scheme of work is structured in a way that allows you to decide precisely what tools and materials you would like to use in the design and creation of an attractive product.
The detailed teacher’s notes provide additional information about constructing light boxes and fitting them with either traditional school electronic components such as bulbs and batteries, or with small and affordable LEDs instead.
Having designed, made and evaluated a light box of their own, the final lesson in this series includes advice and practical activities where children can begin to learn how lights inside electronic products may be programmed and controlled.
All Around Us
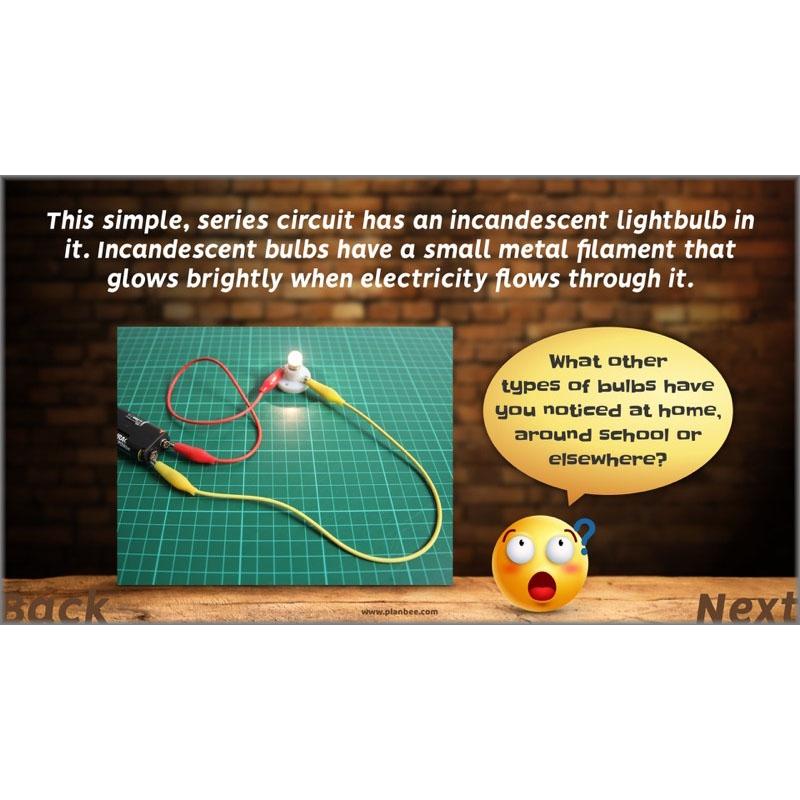
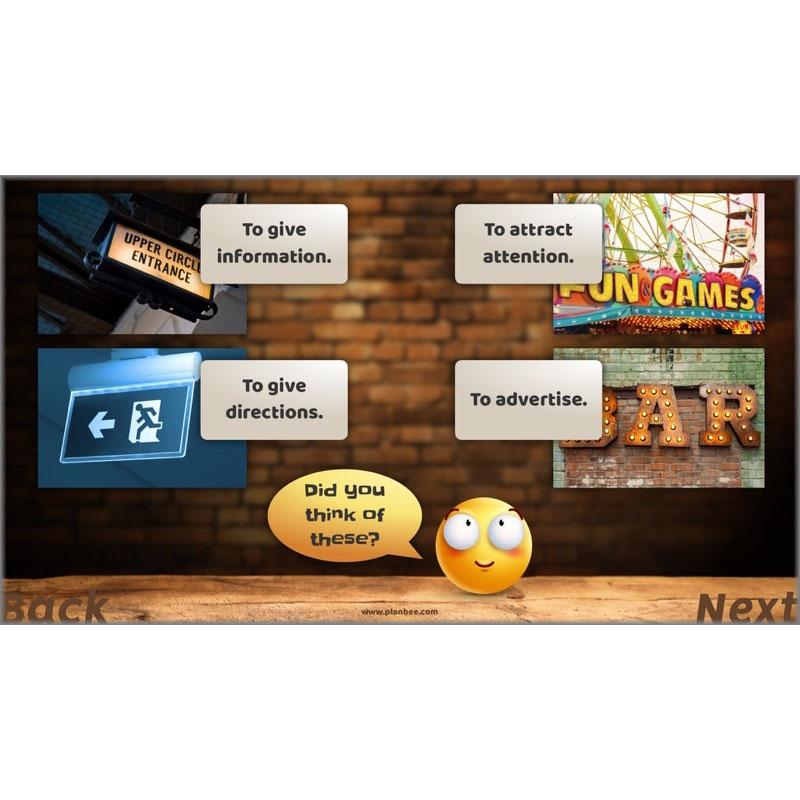
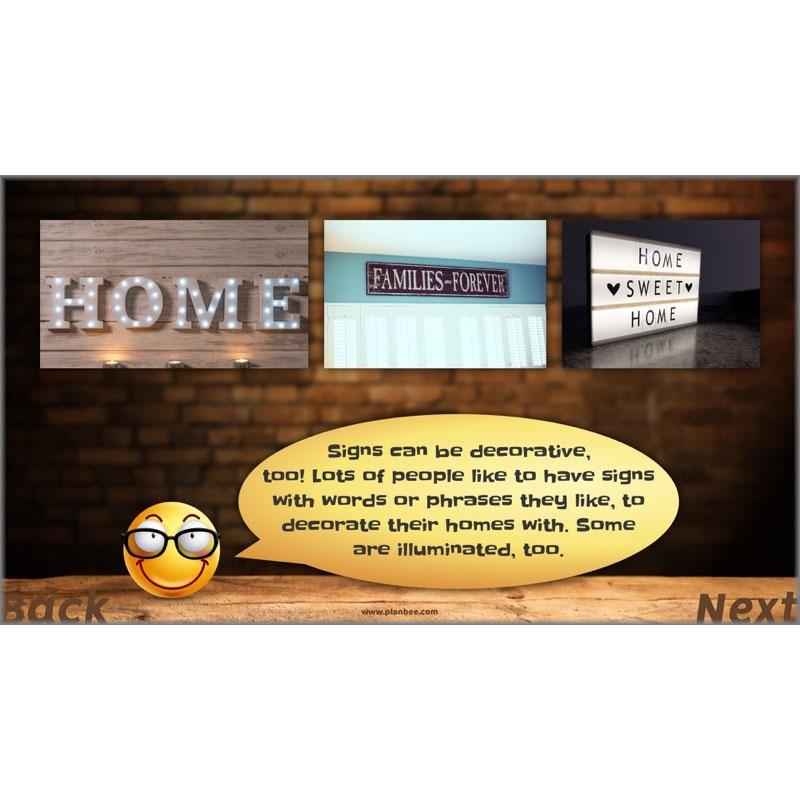
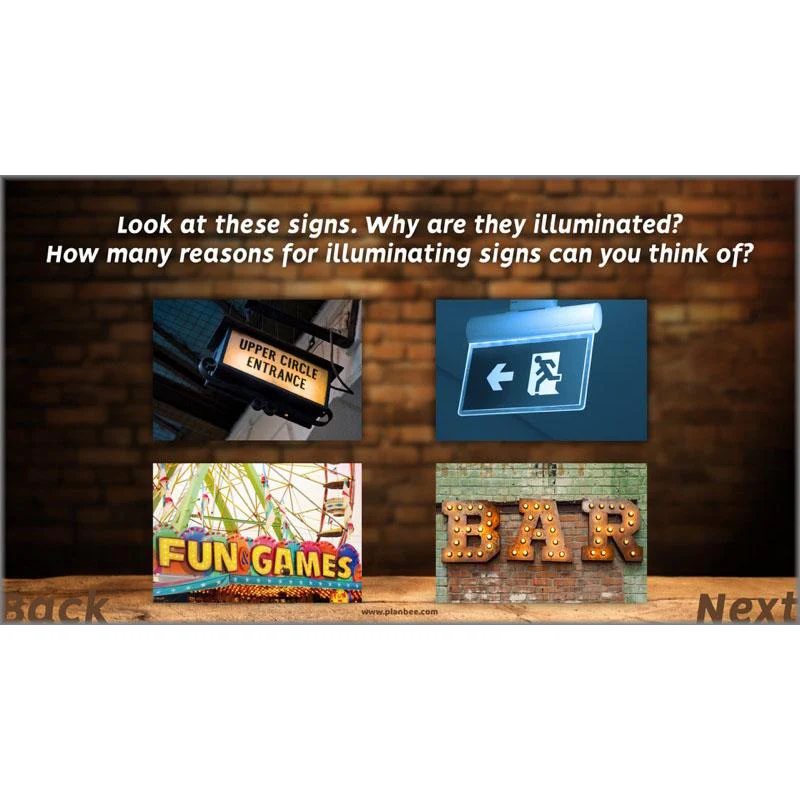
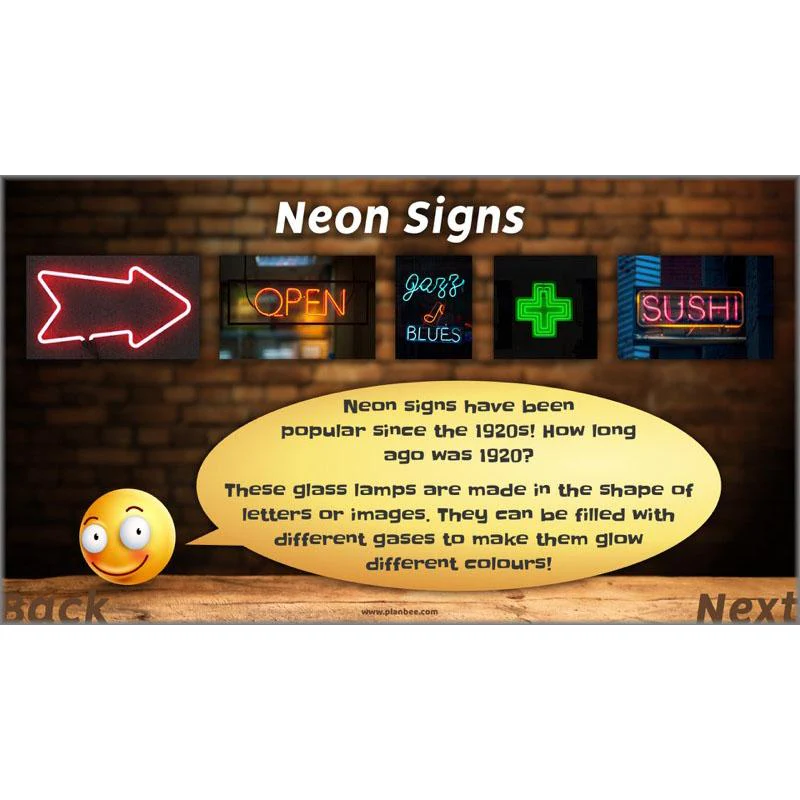
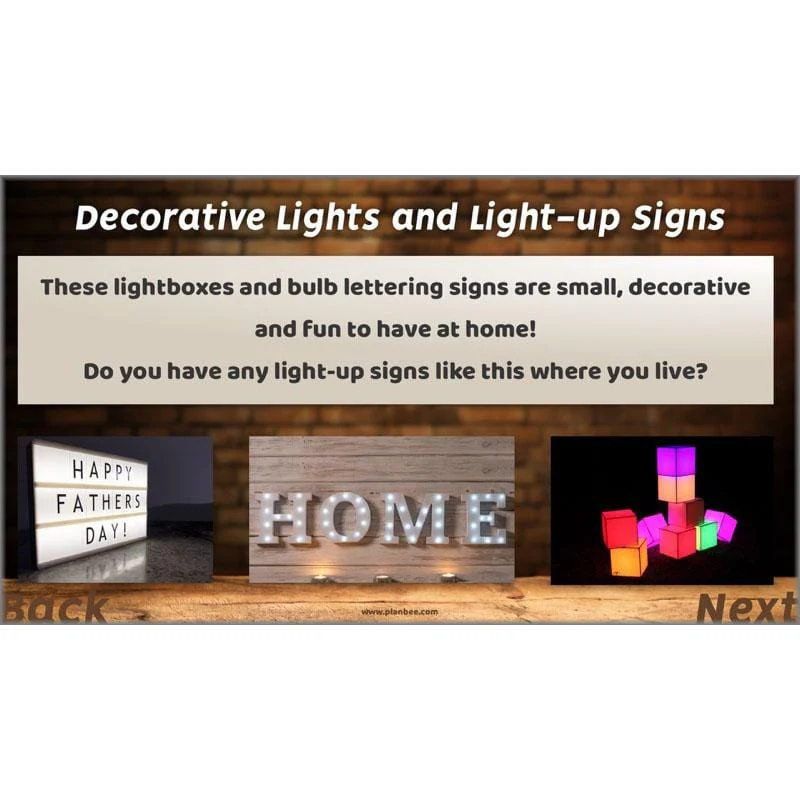
In the first of these six complete lessons for Year 3/4, children will consider the purposes of illuminated signs, then learn about a common techniques used to illuminate shop signs and street signs.
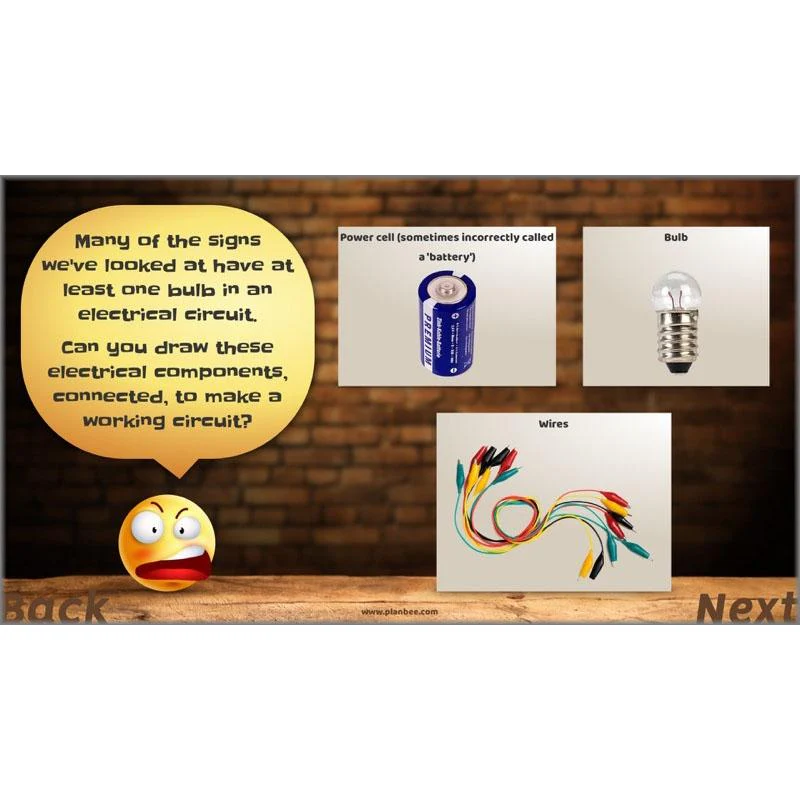
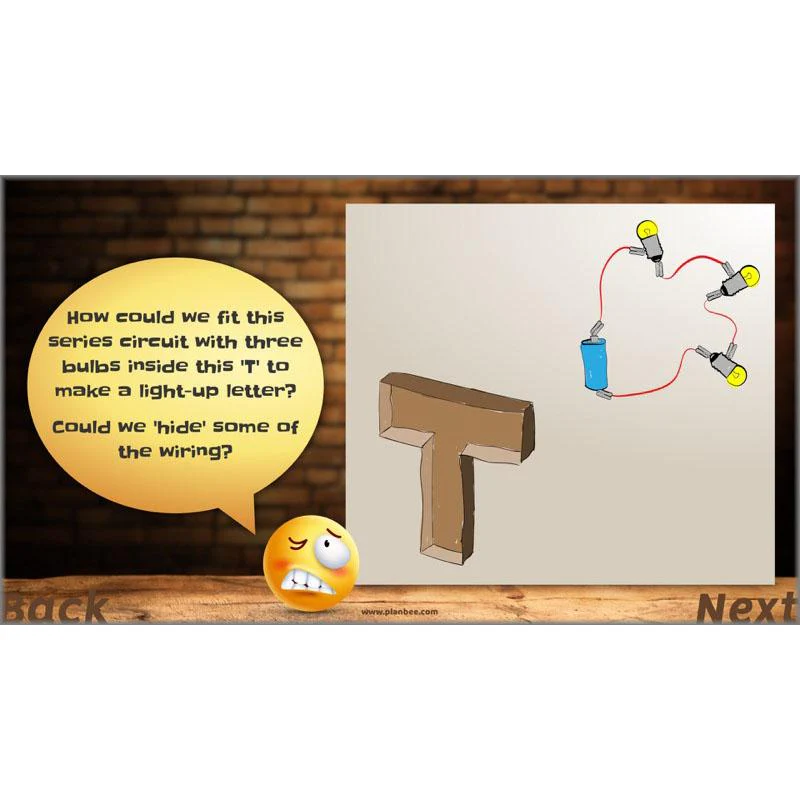
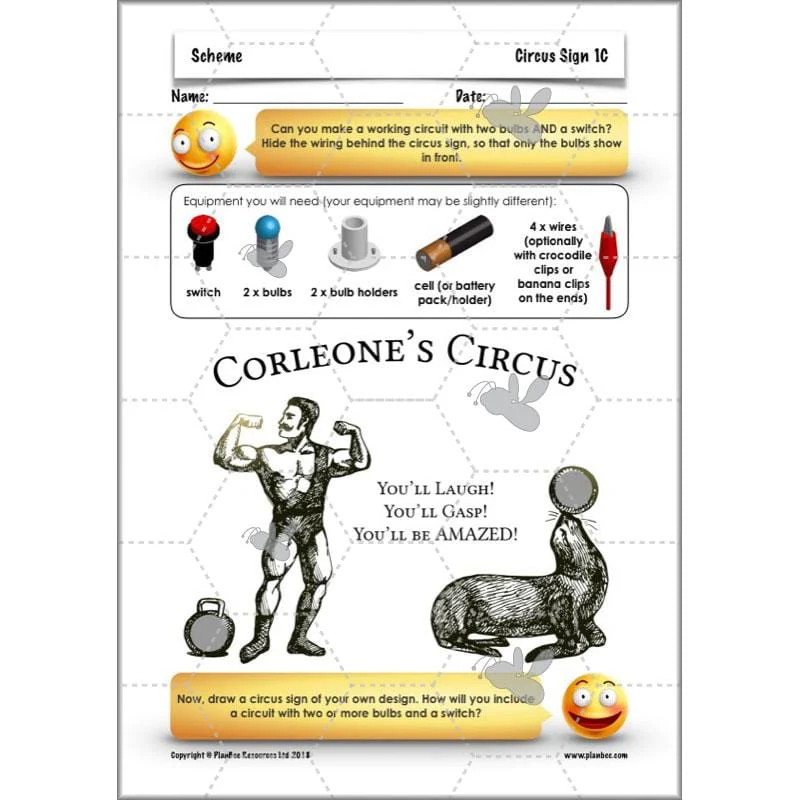
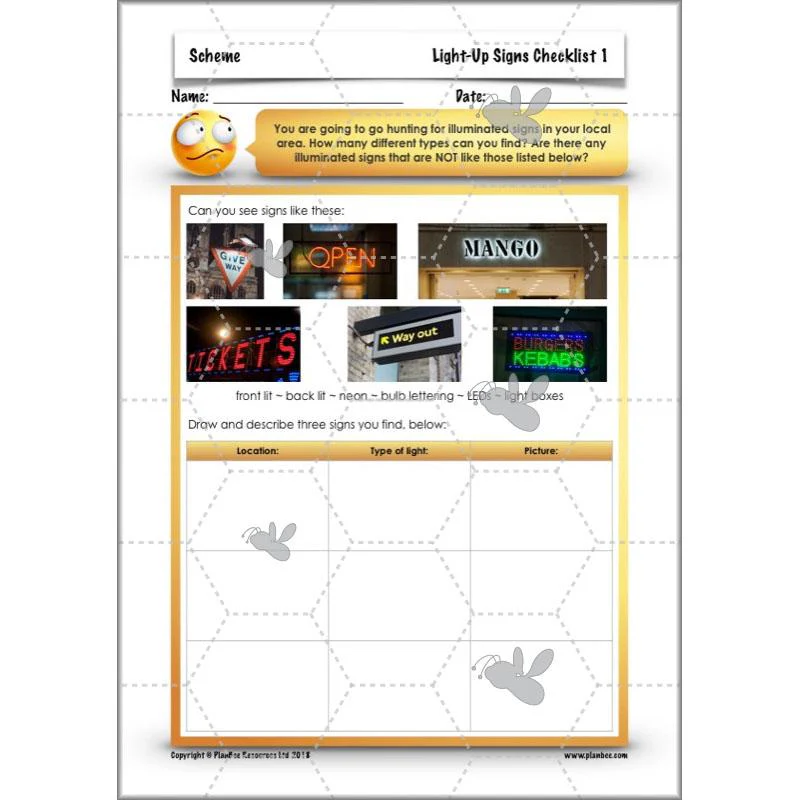
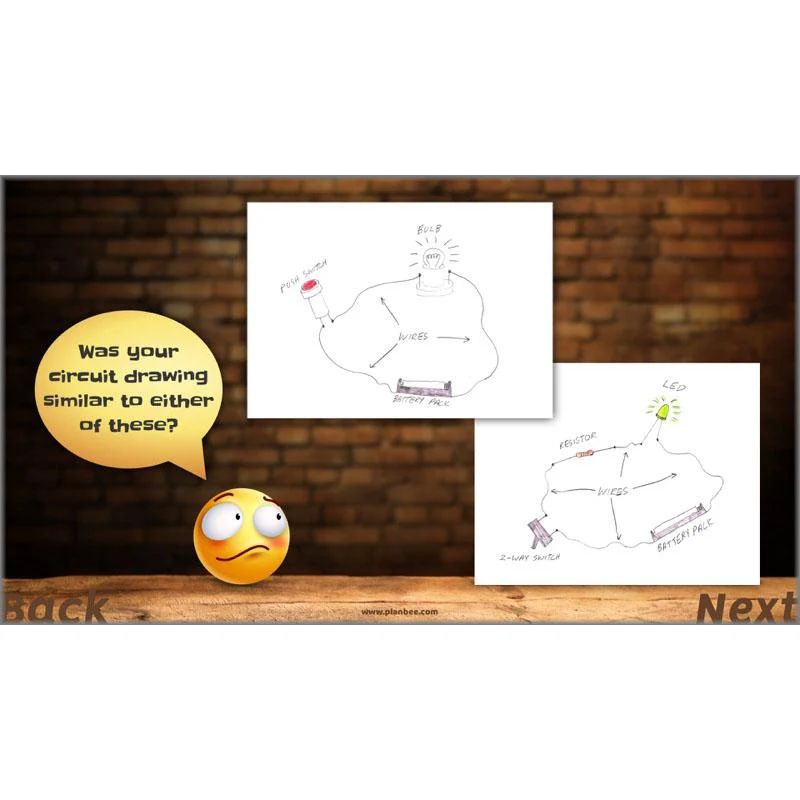
After that, there's a choice of investigative activities for your class to undertake. One, where children may either explore ways of making simple series electrical circuits with one or more bulbs (including starting to think about how certain components such as wires may be hidden out of the way inside products); the other, where children explore a shopping area near you, identifying a range of illuminated signs and their uses.
What's included:
- Lesson plan
- Slides
- Activity ideas
- Differentiated Circus Sign sheets
- Teacher's Notes
- Light-Up Signs checklist
LEDs
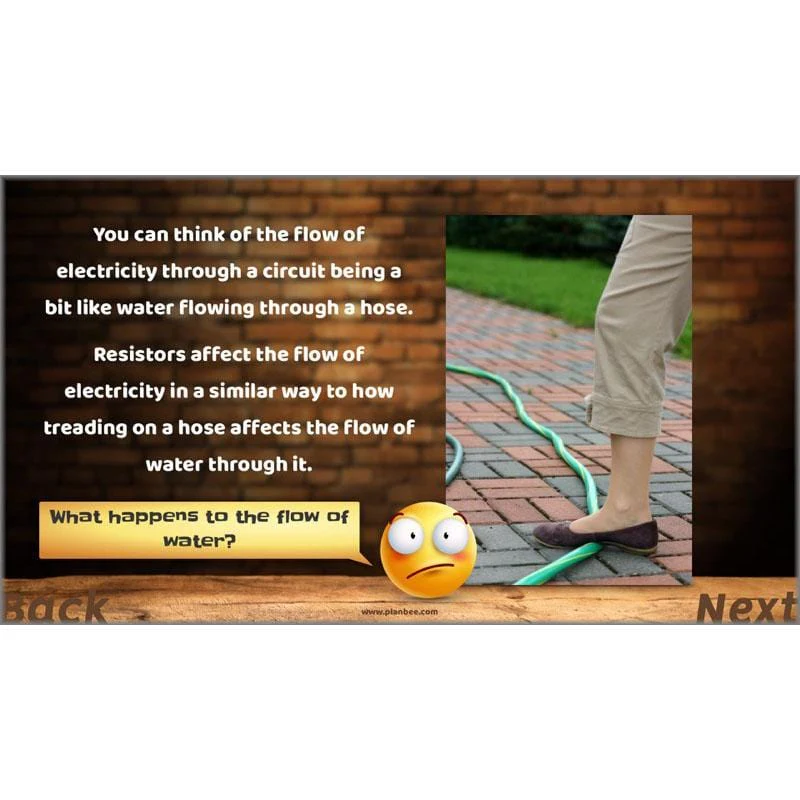
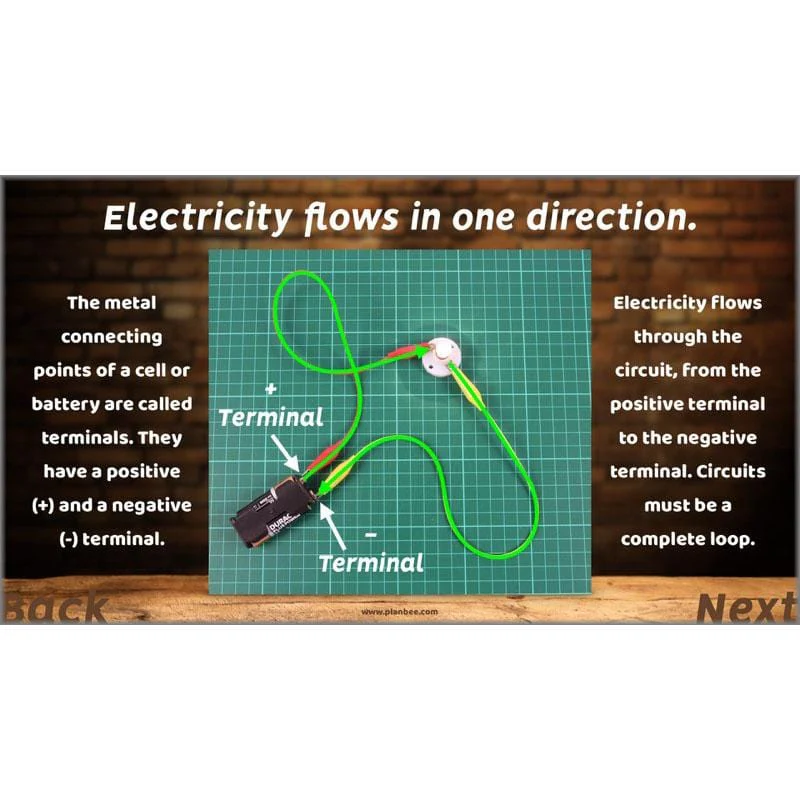
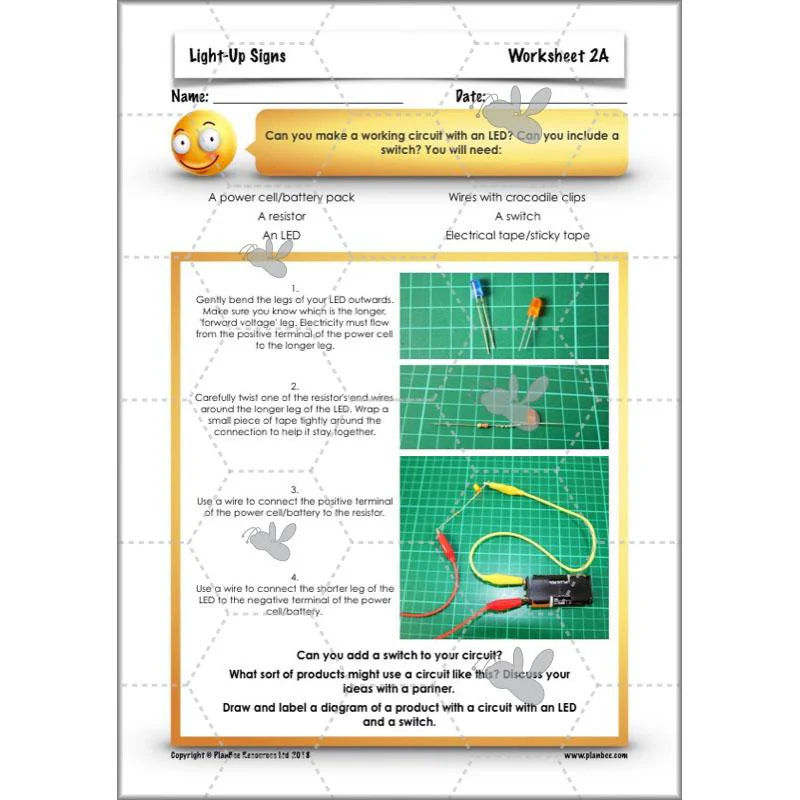
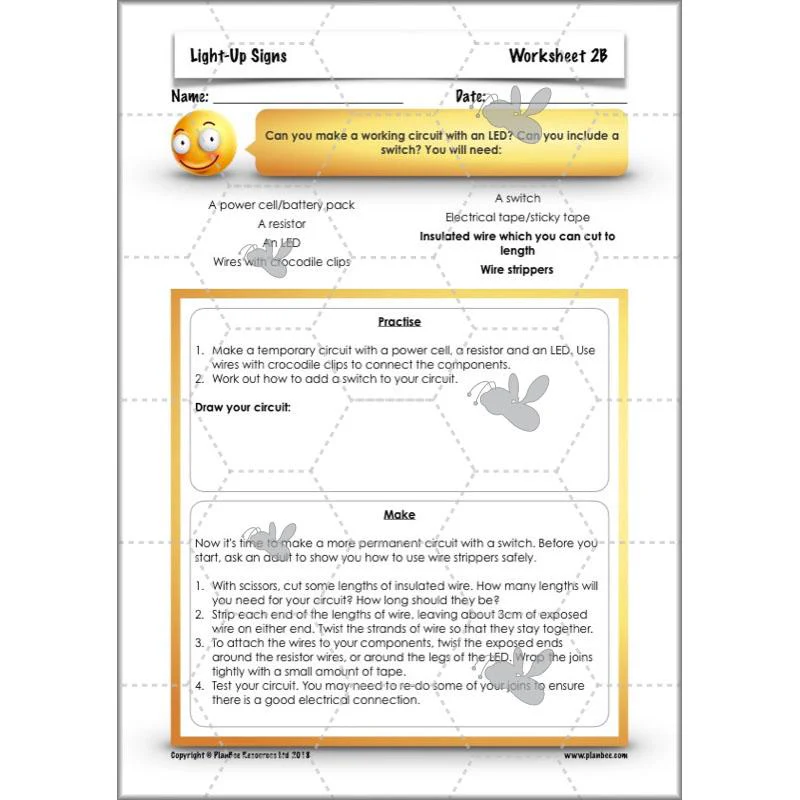
Building on prior learning about simple series circuits, this lesson focuses on LEDs: how and why they are used in many electronic products. The included slides explain in simple terms how LEDs differ from traditional incandescent bulbs, including how current typically only flows through them in one direction. They also describe how resistors are used in circuits to reduce the flow of electricity around a circuit. After that, there's a choice of differentiated learning activities where children may make simple circuits using inexpensive LEDs, or design and make an illuminated sign using art/scrap materials!
What's included:
- Lesson plan
- Slides
- Activity ideas
- Differentiated worksheets
- Teacher's notes
- Challenge card
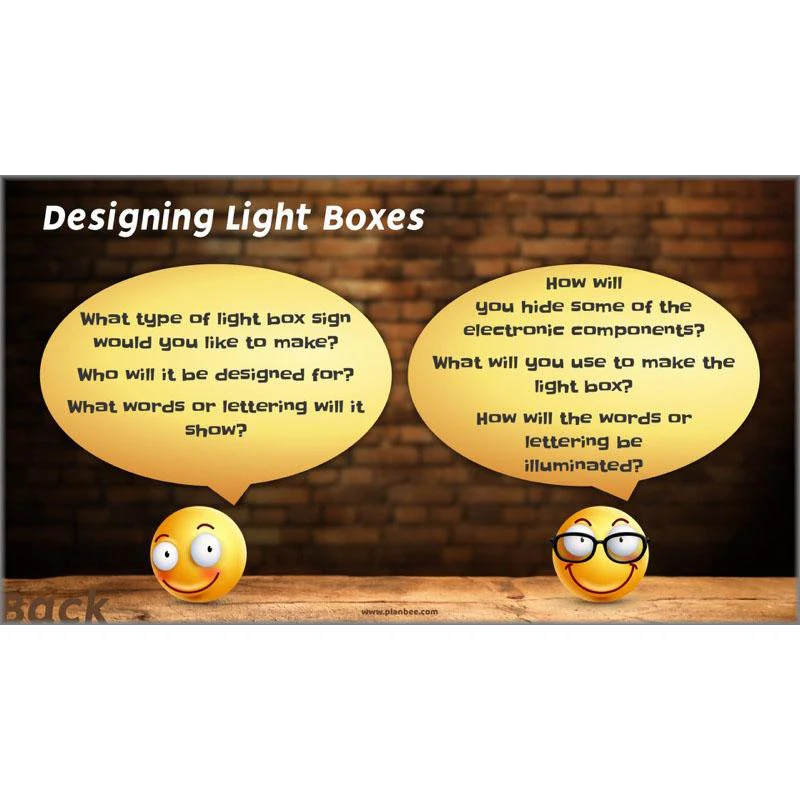
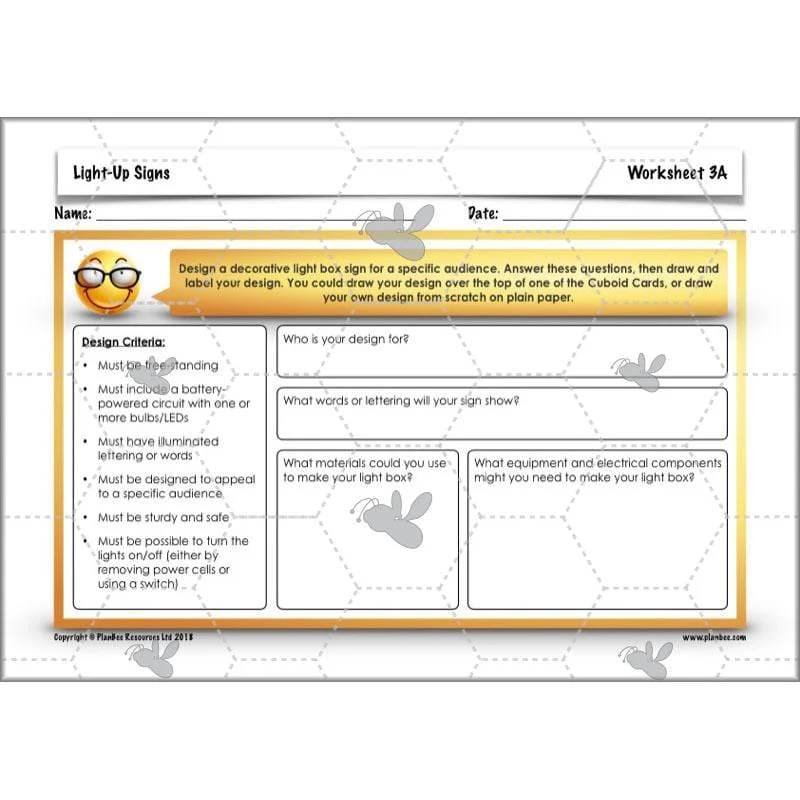
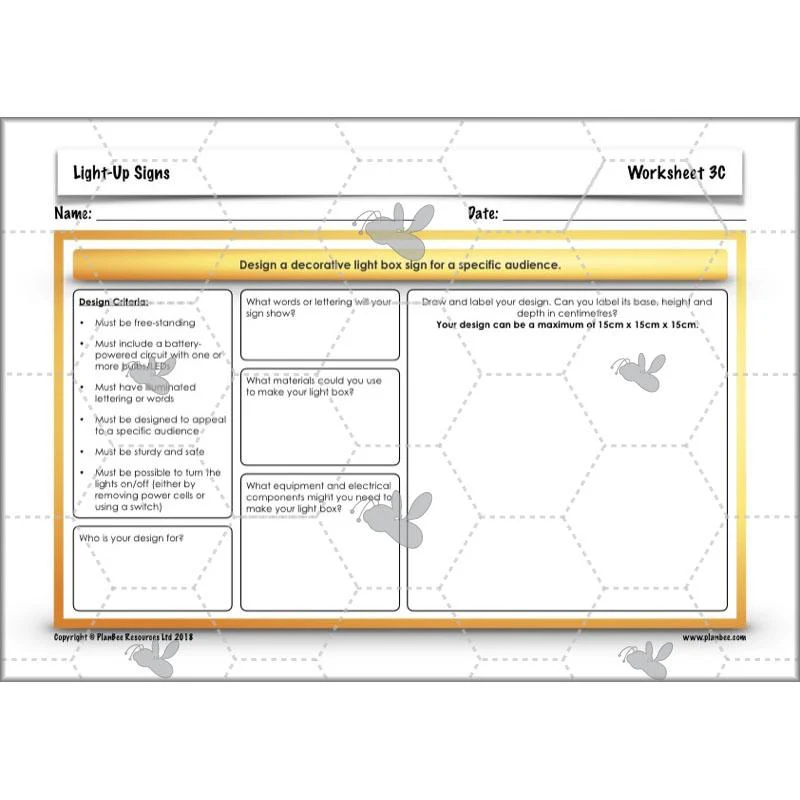
Design a Sign
In this lesson, challenge children to consider ways in which electrical components can be 'hidden' inside a product to make them safer and more attractive.
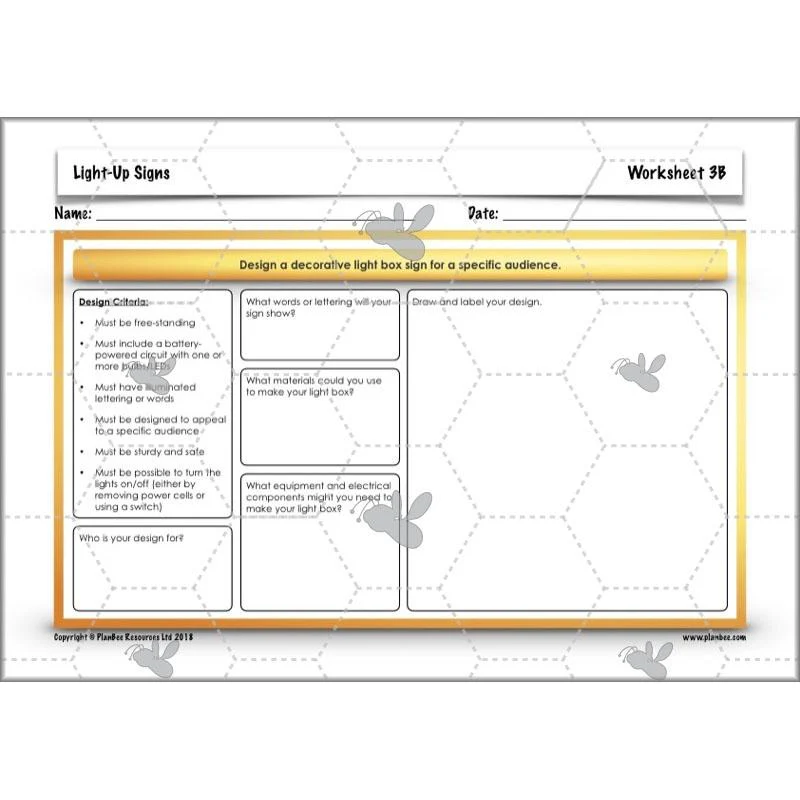
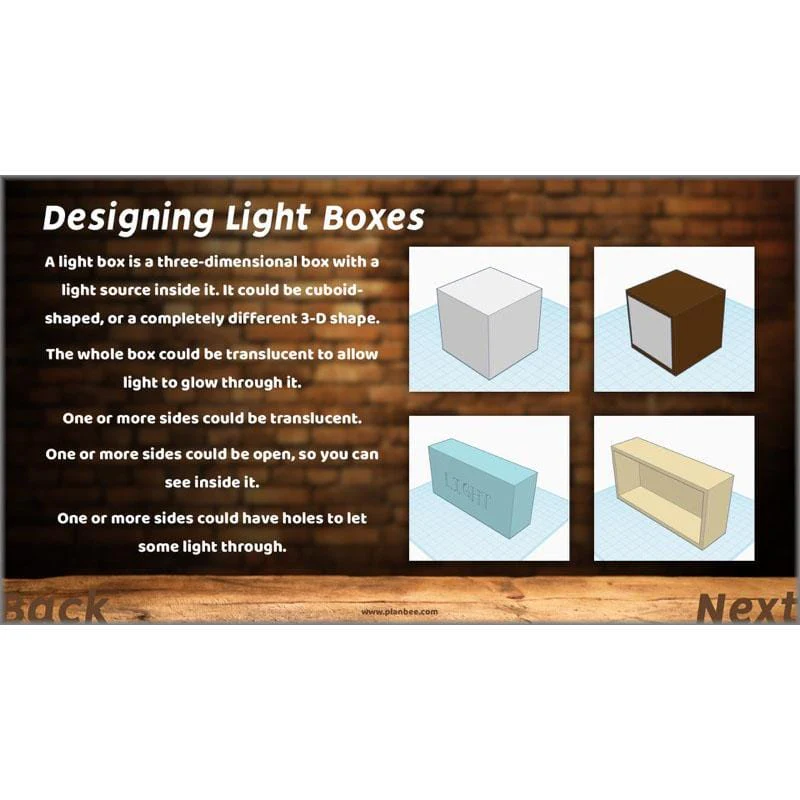
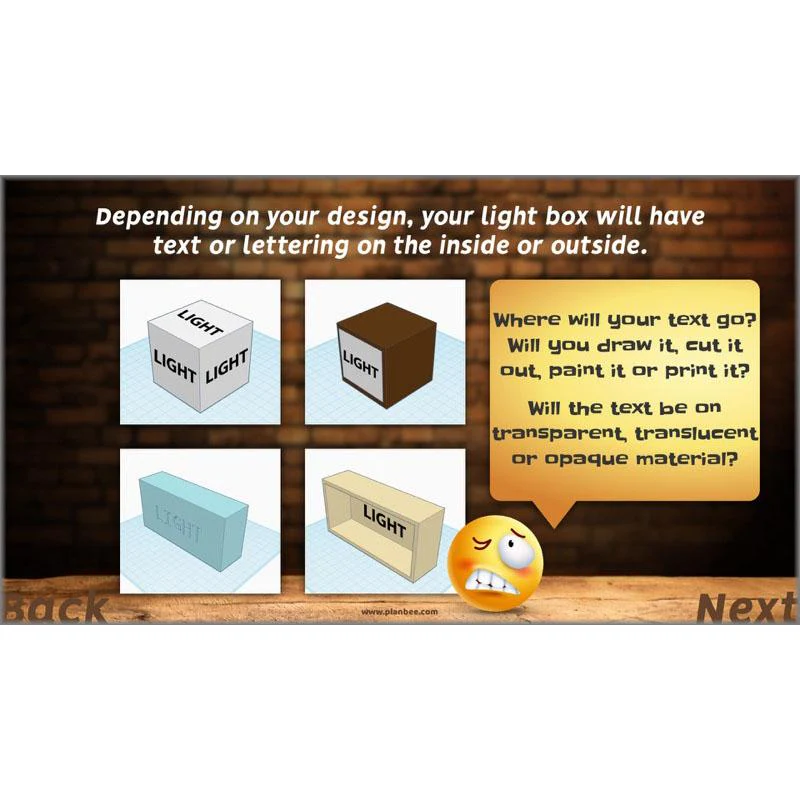
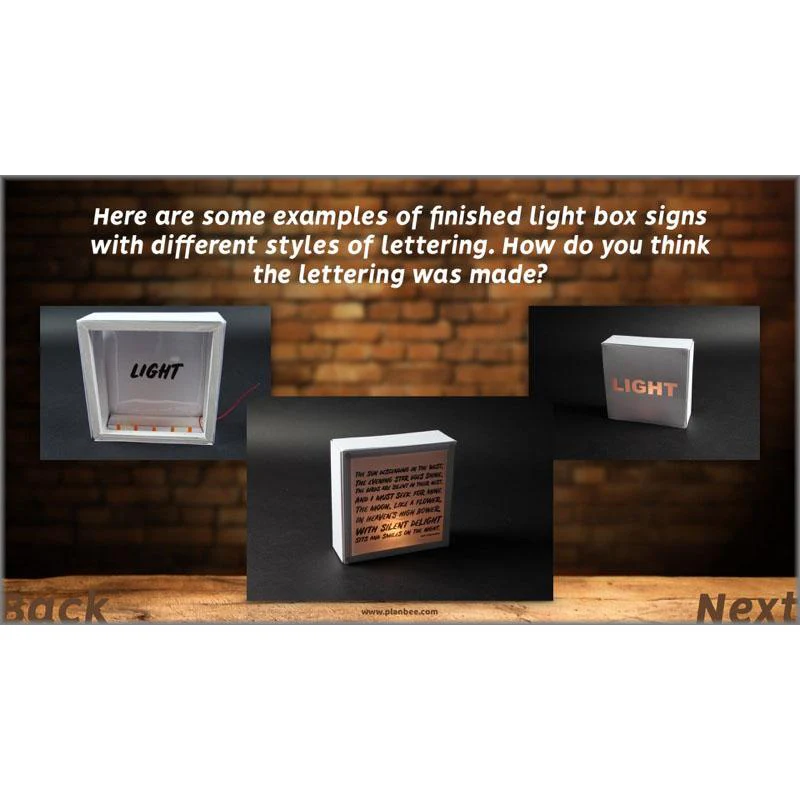
The included slides go on to present your class with some design criteria for a free-standing, light box sign that they will use to develop their own designs. Before they begin designing, they'll have to decide what style of illuminated, decorative sign they will design (based on a few, given choices) and what text or lettering they will include in their design.
After that, there's a choice of differentiated activities where children may either develop designs for a decorative light box sign which they will make in the next couple of lessons in this series, or a standalone activity where they may use CAD software to create 3-D models of light box signs.
What's included:
- Lesson plan
- Slides
- Activity ideas
- Differentiated worksheets
- Teacher's notes
- Challenge card
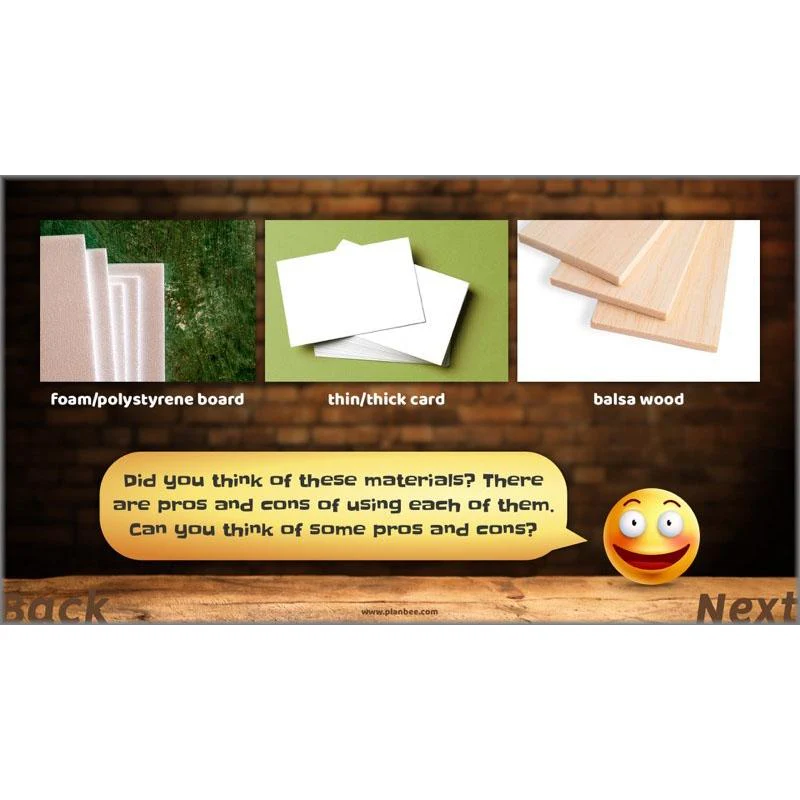
Making a Frame
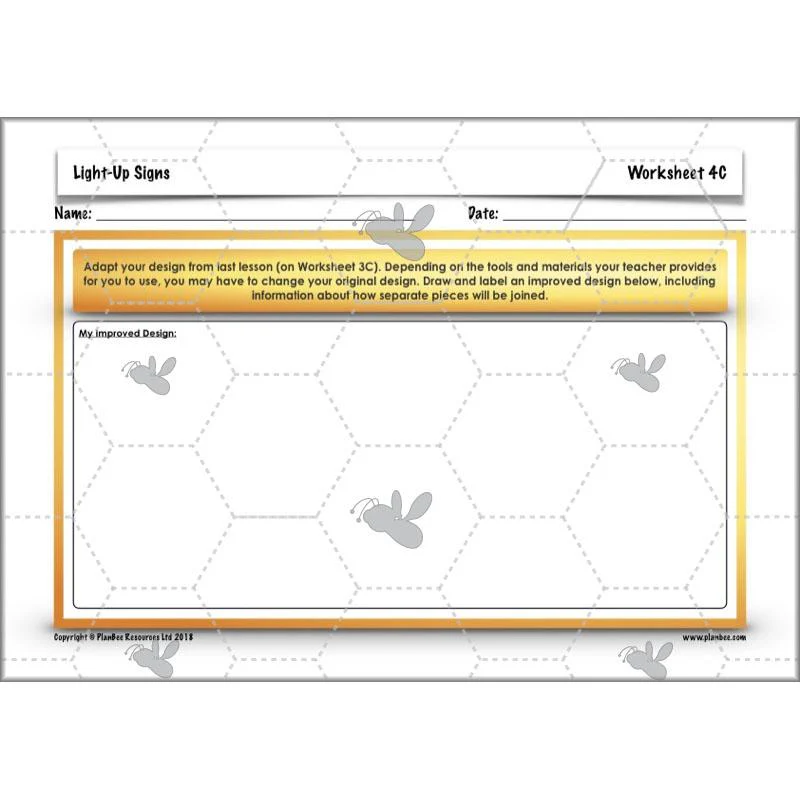
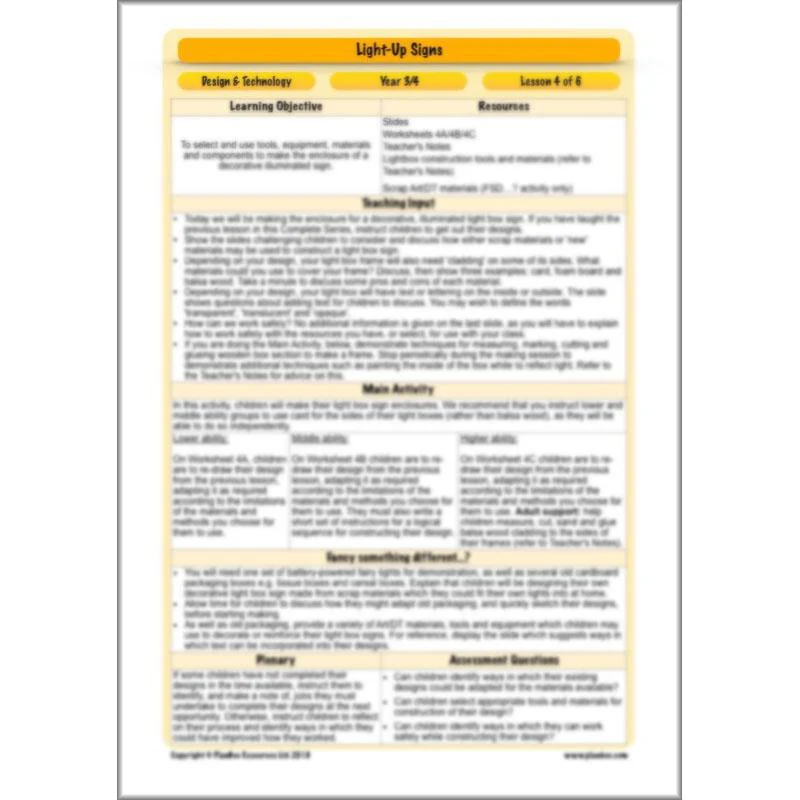
In this lesson, children will get making! Depending on which of the two activities you choose, they may either construct cuboid frames for a decorative, light box sign using wood box section and school woodwork tools, or they may adapt old cardboard packaging to make one.
The included slides share plenty of questions for children to consider and discuss before they start making, and the detailed Teacher's Notes provide plenty of extra information for you, about working safely and effectively, whatever tools and materials you have available.
What's included:
- Lesson plan
- Slides
- Activity ideas
- Differentiated worksheets
- Teacher's notes
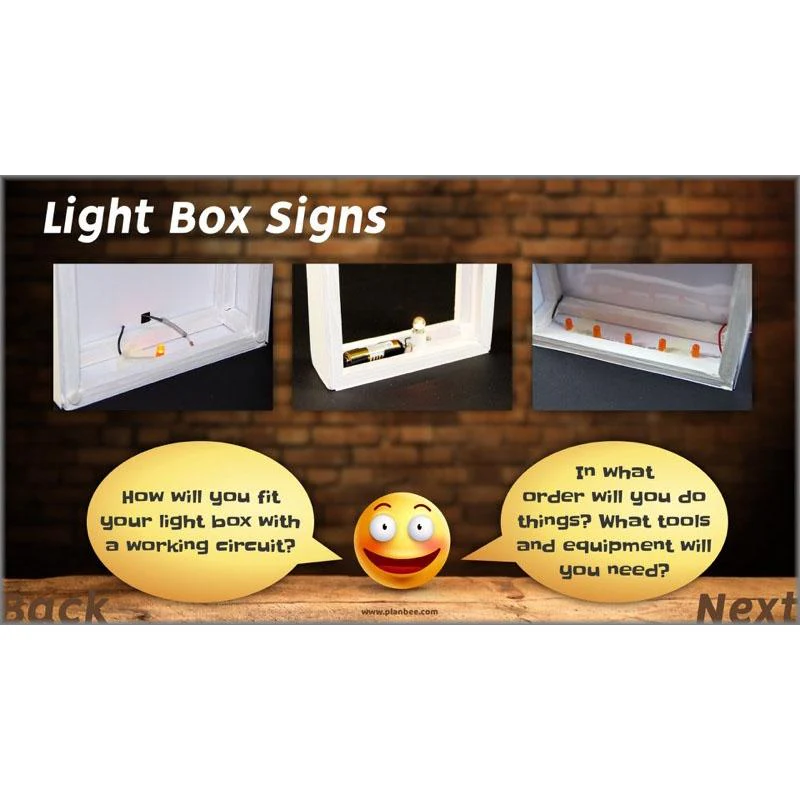
Finishing and Evaluating
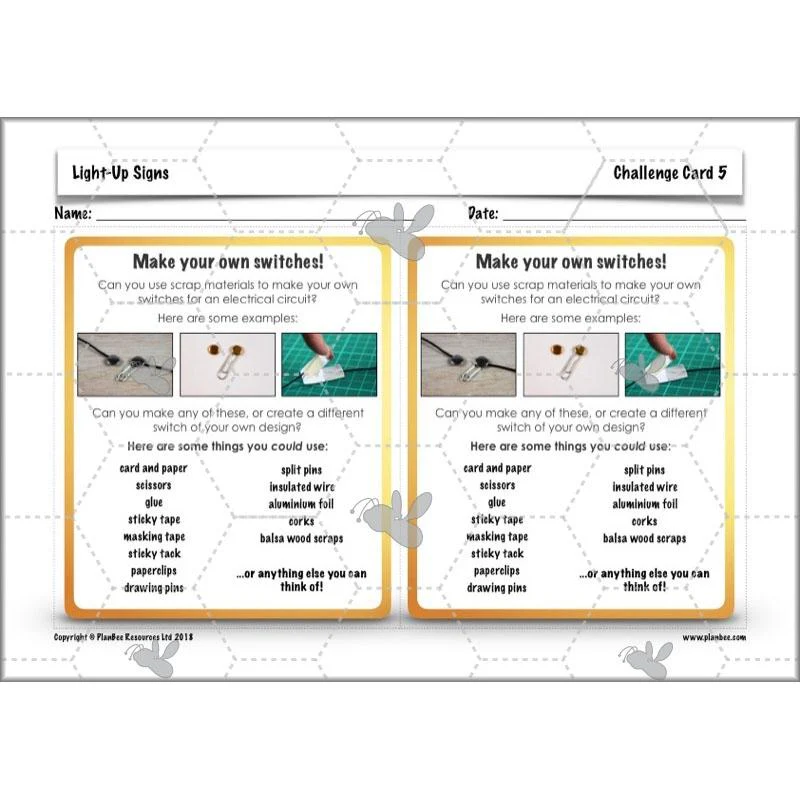
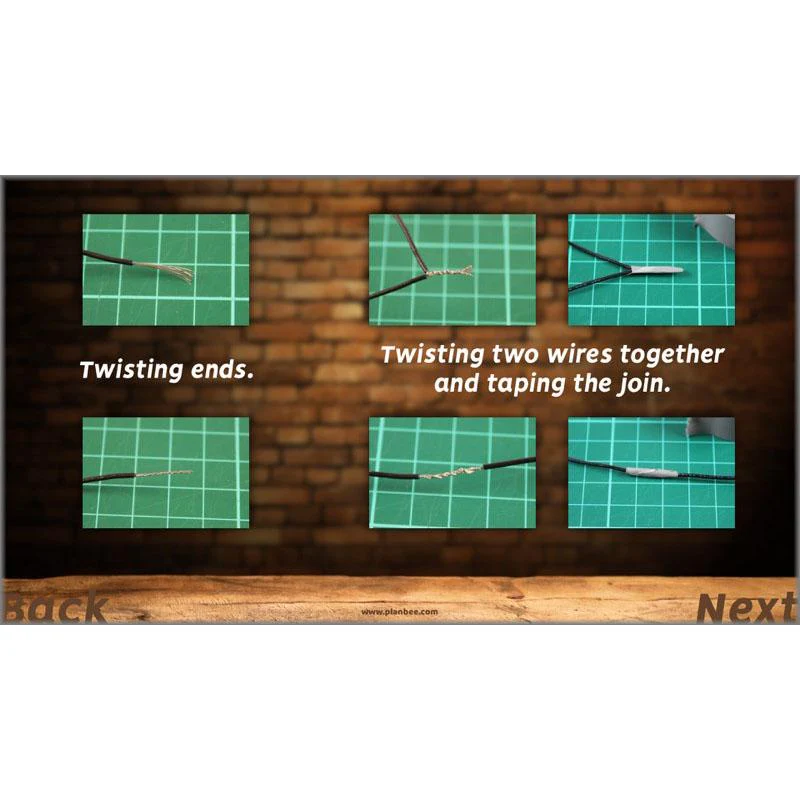
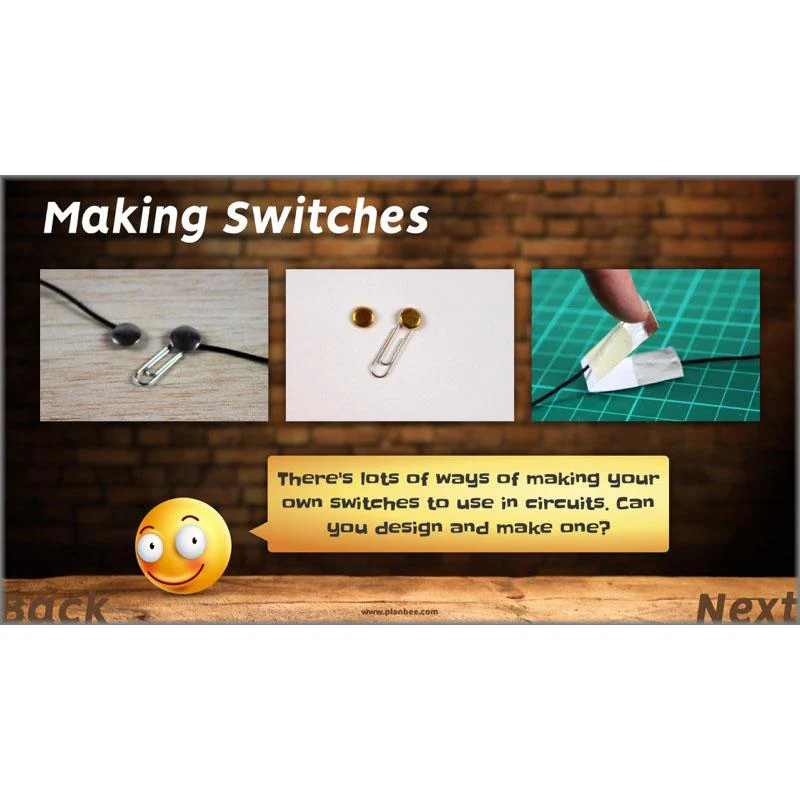
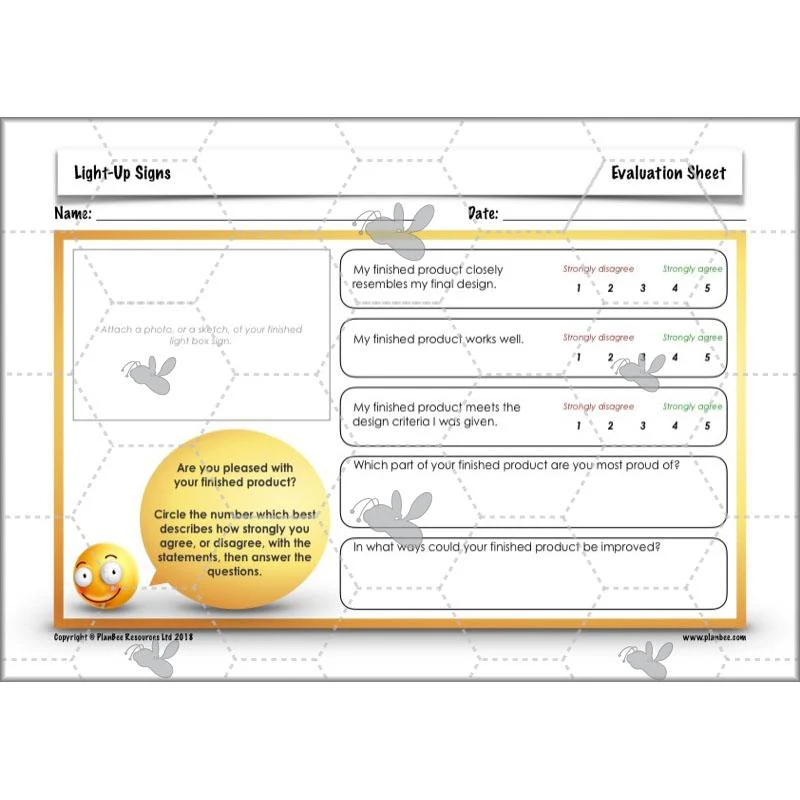
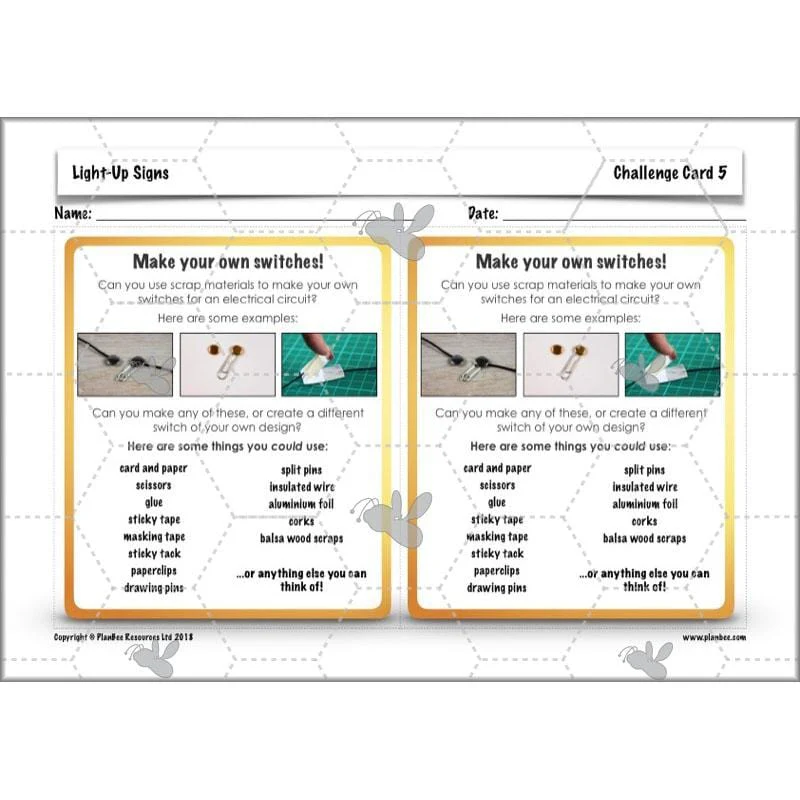
If you've taught previous lessons in this Complete Series, by now your class will be ready to add an electrical circuit with a light to decorative illuminated light box signs which they've made previously. The included slides include several questions for children to consider and discuss, including how they might fit and fix electrical components inside their products. Once children have finished, provide the included evaluation sheets so they can reflect on their learning and making.
Alternatively, there's a standalone, alternative activity included, where children may design and test switches of their own design, made using scrap materials.
What's included:
- Lesson plan
- Slides
- Activity ideas
- Teacher's notes
- Evaluation sheet
- Challenge card
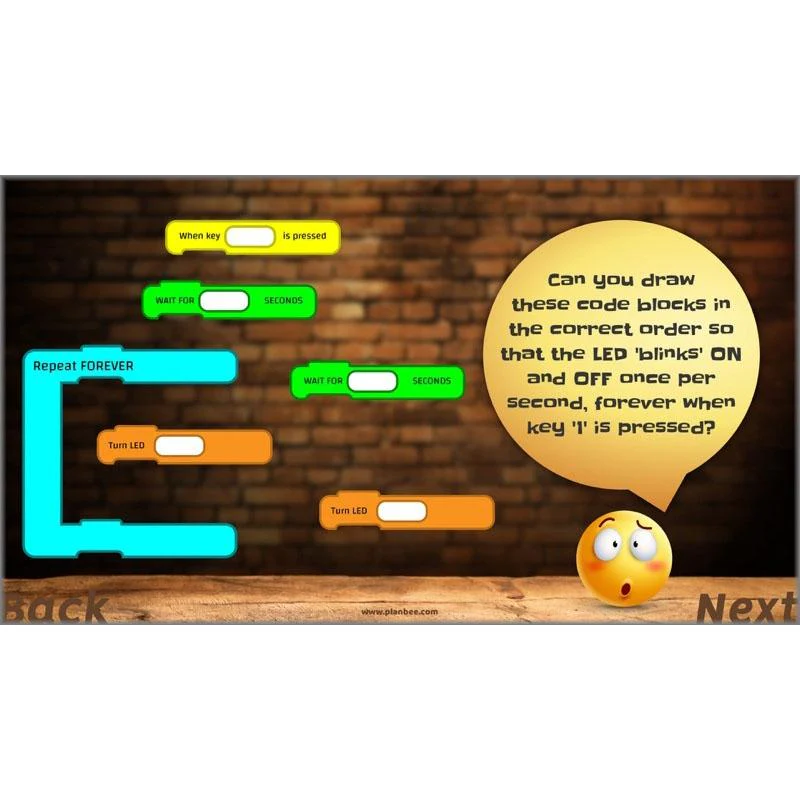
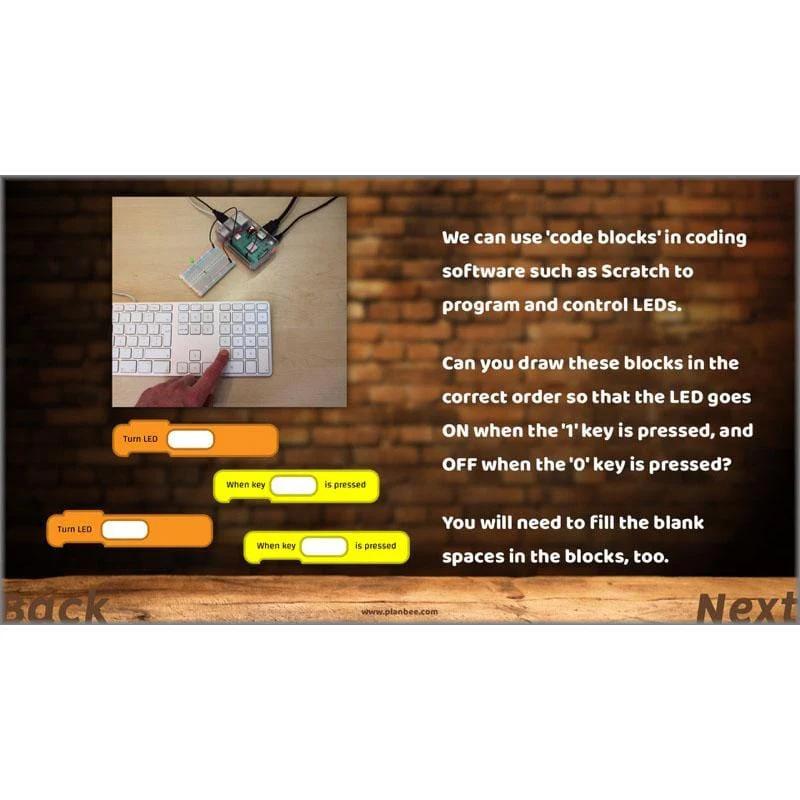
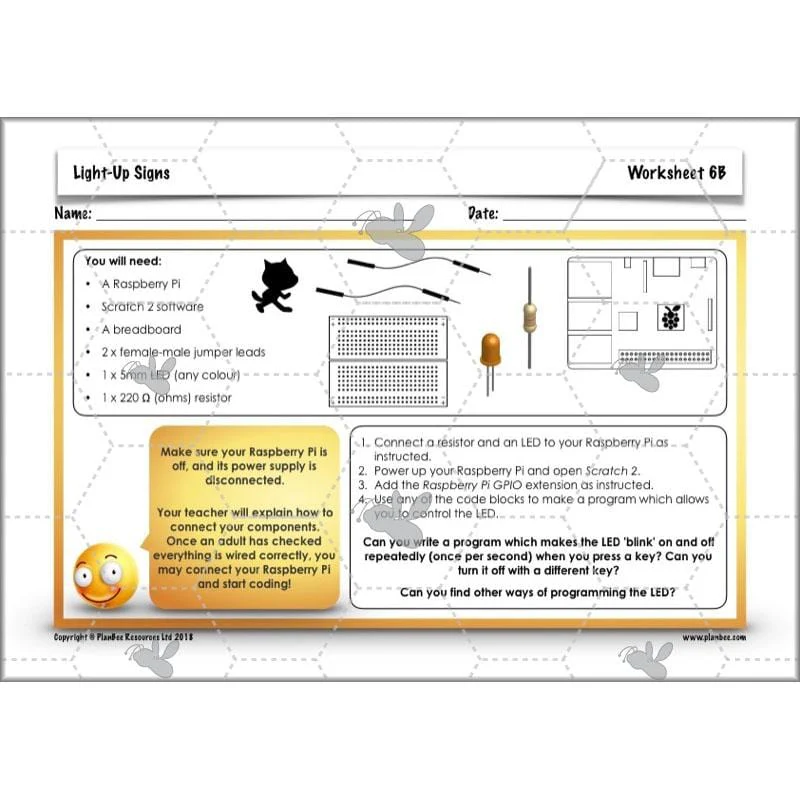
Programming Lights
In this lesson, challenge children to consider ways in which lights, such as LEDs, are used in a range of products – and how they are programmed and controlled. The included slides show some ways in which lights (connected to microcontrollers such as Raspberry Pis or BBC micro:bits) can be programmed and controlled using simple 'code block' software such as Scratch.
After that, there's a choice of activities (depending on the computing resources you have available) where children may either program actual LEDs, or write a program to control virtual Christmas tree lights using Scratch.
What's included:
- Lesson plan
- Slides
- Activity ideas
- Teacher's notes
- Differentiated worksheets
- Challenge cards
Original: $4.62
-70%$4.62
$1.39Product Information
Product Information
Shipping & Returns
Shipping & Returns
Description
Use woodworking DT tools and materials, card and paper or even scrap materials to make an decorative light box with illuminated words or letters. This scheme of work is structured in a way that allows you to decide precisely what tools and materials you would like to use in the design and creation of an attractive product.
The detailed teacher’s notes provide additional information about constructing light boxes and fitting them with either traditional school electronic components such as bulbs and batteries, or with small and affordable LEDs instead.
Having designed, made and evaluated a light box of their own, the final lesson in this series includes advice and practical activities where children can begin to learn how lights inside electronic products may be programmed and controlled.
All Around Us
In the first of these six complete lessons for Year 3/4, children will consider the purposes of illuminated signs, then learn about a common techniques used to illuminate shop signs and street signs.
After that, there's a choice of investigative activities for your class to undertake. One, where children may either explore ways of making simple series electrical circuits with one or more bulbs (including starting to think about how certain components such as wires may be hidden out of the way inside products); the other, where children explore a shopping area near you, identifying a range of illuminated signs and their uses.
What's included:
- Lesson plan
- Slides
- Activity ideas
- Differentiated Circus Sign sheets
- Teacher's Notes
- Light-Up Signs checklist
LEDs
Building on prior learning about simple series circuits, this lesson focuses on LEDs: how and why they are used in many electronic products. The included slides explain in simple terms how LEDs differ from traditional incandescent bulbs, including how current typically only flows through them in one direction. They also describe how resistors are used in circuits to reduce the flow of electricity around a circuit. After that, there's a choice of differentiated learning activities where children may make simple circuits using inexpensive LEDs, or design and make an illuminated sign using art/scrap materials!
What's included:
- Lesson plan
- Slides
- Activity ideas
- Differentiated worksheets
- Teacher's notes
- Challenge card
Design a Sign
In this lesson, challenge children to consider ways in which electrical components can be 'hidden' inside a product to make them safer and more attractive.
The included slides go on to present your class with some design criteria for a free-standing, light box sign that they will use to develop their own designs. Before they begin designing, they'll have to decide what style of illuminated, decorative sign they will design (based on a few, given choices) and what text or lettering they will include in their design.
After that, there's a choice of differentiated activities where children may either develop designs for a decorative light box sign which they will make in the next couple of lessons in this series, or a standalone activity where they may use CAD software to create 3-D models of light box signs.
What's included:
- Lesson plan
- Slides
- Activity ideas
- Differentiated worksheets
- Teacher's notes
- Challenge card
Making a Frame
In this lesson, children will get making! Depending on which of the two activities you choose, they may either construct cuboid frames for a decorative, light box sign using wood box section and school woodwork tools, or they may adapt old cardboard packaging to make one.
The included slides share plenty of questions for children to consider and discuss before they start making, and the detailed Teacher's Notes provide plenty of extra information for you, about working safely and effectively, whatever tools and materials you have available.
What's included:
- Lesson plan
- Slides
- Activity ideas
- Differentiated worksheets
- Teacher's notes
Finishing and Evaluating
If you've taught previous lessons in this Complete Series, by now your class will be ready to add an electrical circuit with a light to decorative illuminated light box signs which they've made previously. The included slides include several questions for children to consider and discuss, including how they might fit and fix electrical components inside their products. Once children have finished, provide the included evaluation sheets so they can reflect on their learning and making.
Alternatively, there's a standalone, alternative activity included, where children may design and test switches of their own design, made using scrap materials.
What's included:
- Lesson plan
- Slides
- Activity ideas
- Teacher's notes
- Evaluation sheet
- Challenge card
Programming Lights
In this lesson, challenge children to consider ways in which lights, such as LEDs, are used in a range of products – and how they are programmed and controlled. The included slides show some ways in which lights (connected to microcontrollers such as Raspberry Pis or BBC micro:bits) can be programmed and controlled using simple 'code block' software such as Scratch.
After that, there's a choice of activities (depending on the computing resources you have available) where children may either program actual LEDs, or write a program to control virtual Christmas tree lights using Scratch.
What's included:
- Lesson plan
- Slides
- Activity ideas
- Teacher's notes
- Differentiated worksheets
- Challenge cards